Monday, February 4, 2013

o365 - SP2013 Preview Branding....

Recently I tried my hands on branding SP2013 preview site and wanted to share this with the community. SP2013 has vastly reduced the overhead that we had in SP2010 for branding by giving us the flexibility of using the HTML editor of your own choice rather than SP designer. Today we will focus on some of the different ways you can achieve branding in SP2013.

To start with I had to go ahead and create a SP2013 preview account, this is easy to get started with for a free trial. I have blogged about how a  trial preview account can be set up earlier. click here to learn more..

Create a site based off publishing site template and here's how the provisioned site looks..

 
Design Manager :

SP2013 has a new feature called as the Design Manager : In SharePoint 2013, Design Manager can help web developers and designers build and export the visual design of a SharePoint site collection as a package. This package can easily be distributed to customers, or other designated groups, for installation on their site collections. This new feature reduces the complexity of transporting designs, and makes it easier for customers to outsource the visual design of their sites. To access the design manager go to site settings ..


This will give you a list of links on left navigation and in this blog we will go though a simple process of changing the master page using some of the left navigation links of the Design Manager.
 
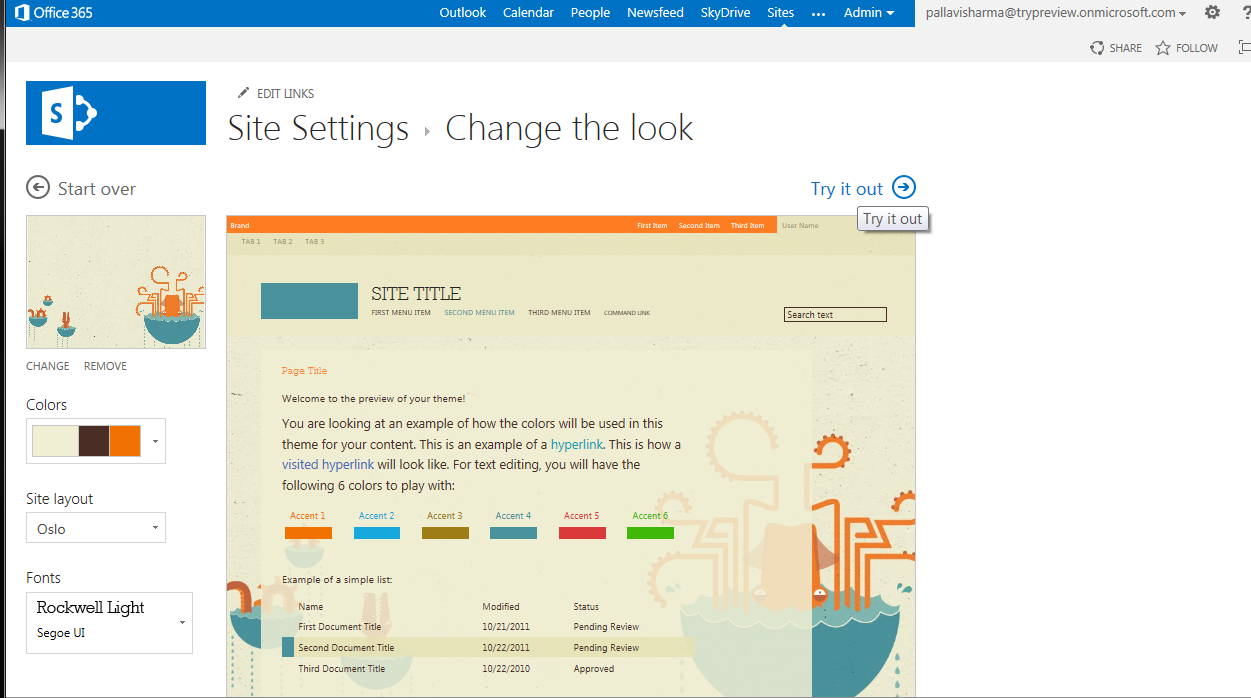
A quick and easy way to change the look of your site if you like what you see in the preview.


Custom Master (HTML) :
 
If you have not happy with what you get in the out of the box options of changing the look and feel there are options to also modify that or create your own custom master page.
 
Create a new minimal Master to start with an empty canvas and start adding your functional branding components via the HTML snippet tool.
 
Very important note : As long as the master page and the HTML file are associated you will only be allowed to change the HTML and not the master.


Insert Snippet:

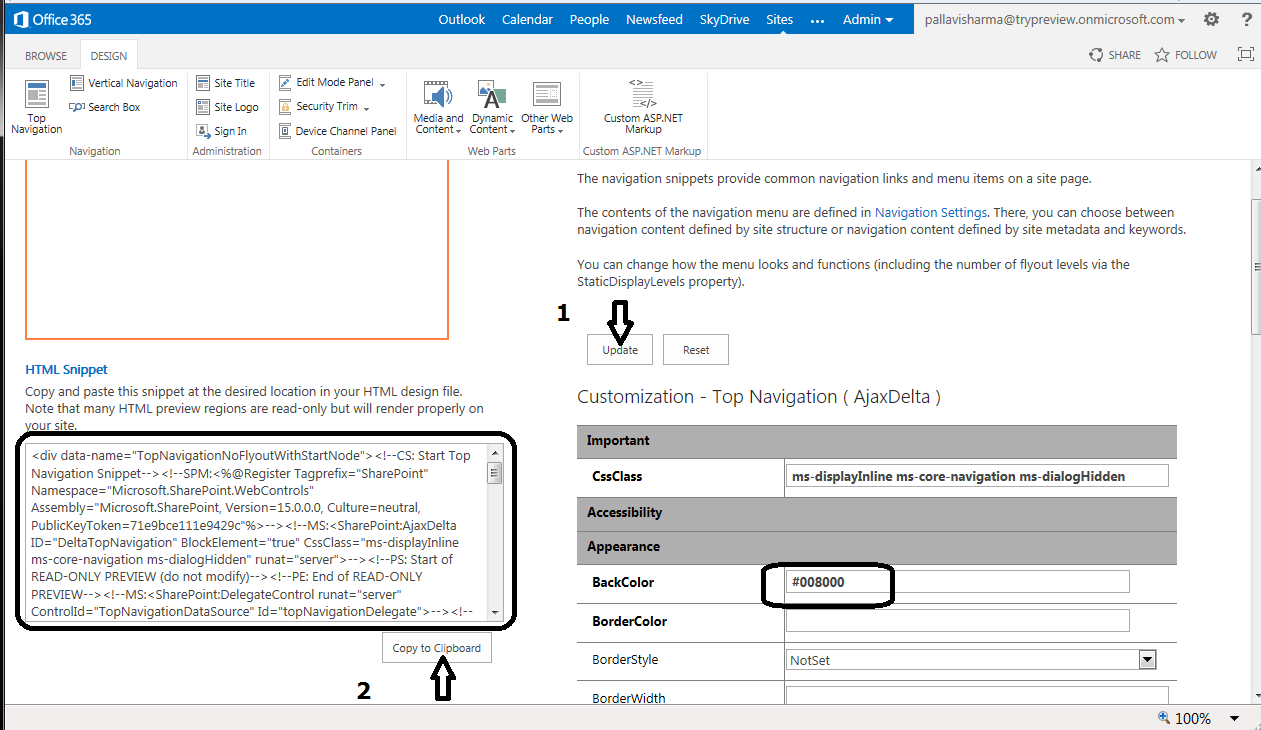
Click on the Snippet link. This will redirect you to a snippet tool editor which is customized based on whether you are creating snippets for a master page or a page layout.

Click the Top Navigation button in the ribbon.This will create the HTML snippet you need.You can customize the properties of the top navigation control and click on “Update” to generate the new snippet. Now  copy the HTML snippet to the clipboard and paste it in the right location in the HTML file. Save and Publish the HTML file.


Explore your Branding elements files via the Explorer :
 
You can also map your local drive to the online account and use any HTML editor of you choice to edit your branding assets. This gives great flexibility to the end user for designing.


SharePoint Designer 2013 Preview :
 
Download SPdesigner 2013 from here if you are still hooked to the Designer as I am. Old habits die hard.......


Publish the master files


Specify Css and Script files if any in the master page

 <link href="_catalogs/masterpage/Custom/Custom.css" rel="stylesheet" type="text/css" />  


Site settings : Master Page -

Set the new master page as your custom master page.


New look and feel...........


The html file and the master page are associated with each other and SharePoint does not allow you to delete the master page or even publish it as long the association is still there.If you wish to remove the association, go to the master page gallery.

   1.Select the Html file
   2.Edit Properties
   3.Uncheck the “Associated File” check box.
   4.Save


You could also build the master page per the specifications and then, disassociate the html file, package the master page in a wsp and then deploy it to your various environments.
      Or
Use the design manager to create a design Package which can be imported across
environments. This is what I will be exploring more in my next blog.


Monday, January 28, 2013

Send email in Sharepoint - Explore Options!

Today I am going to explore options we have to send emails in SharePoint. I find it very interesting that there are a couple of ways to send emails. Sending notifications is a very frequently asked feature from the clients in any application and SharePoint has an out of box feature called alerts.

MSDN - Alerts Details


Option 1:

Store the SMTP server address in the web.config and can utilize the send email function as below:

This ensures that you get the advantages of.NET-style mail delivery while keeping your configuration at one place in your Central Administration.
 
using System;
using System.Web.UI;
using System.Web.UI.WebControls;
using System.Web.UI.WebControls.WebParts;
using System.Net.Mail;
using Microsoft.SharePoint;

namespace Send_Email.Send_Email
{
    public partial class Send_EmailUserControl : UserControl
    {
        protected void Page_Load(object sender, EventArgs e)
        {
        }

        protected void Button1_Click(object sender, EventArgs e)
        {
            bool sentemail = SendMail("Hello", "Test Body", false, "pallavi.sharma@xyz.com", "pallavi.sharma@neudesic.com", "", "");
        }
        public static bool SendMail(string Subject, string Body, bool IsBodyHtml, string From, string To, string Cc, string Bcc)
        {
            bool mailSent = false;
            try
            {
                SmtpClient smtpClient = new SmtpClient();
                smtpClient.Host = SPContext.Current.Site.WebApplication.
                OutboundMailServiceInstance.Server.Address;
                MailMessage mailMessage = new MailMessage(From, To, Subject, Body);
                if (!String.IsNullOrEmpty(Cc))
                {
                    MailAddress CCAddress = new MailAddress(Cc);
                    mailMessage.CC.Add(CCAddress);
                }
                if (!String.IsNullOrEmpty(Bcc))
                {
                    MailAddress BCCAddress = new MailAddress(Bcc);
                    mailMessage.Bcc.Add(BCCAddress);
                }
                mailMessage.IsBodyHtml = IsBodyHtml;
                smtpClient.Send(mailMessage);
                mailSent = true;
            }
            catch (Exception) { return mailSent; }
            return mailSent;
        }

    }
}


  If the SharePoint context is not available utilize the SPWebApplication reference from a new SPSite object :

public static string GetSharePointMailService(string mysite)
 {
 string address;
 using (SPSite site = new SPSite(mysite))
 {
 address = site.WebApplication.OutboundMailServiceInstance.Server.Address;
 }
 return address;
 }


Option 2 :

Utilize the embedded SharePoint SendEmail. This has reduced capabilities, but is as straightforward as possible, and is the preferred approach if you simply want to send e-mail.

SPUtility.SendEmail(web, useHtml, htmlEncode, to, subject, htmlBody)


 Option 3 :

Sending E-Mail from a WCF Service

try
 {
 using (SPSite site = new SPSite(“http://server name”))
 {
 SPWeb myWeb = site.RootWeb;
 {
 string to = “someone@Someone.com”;
 string subject = “My Subject Message”;
 string body = “My Message Body”;
 HttpContext curCtx = HttpContext.Current;
 HttpContext.Current = null;
 bool success = SPUtility.SendEmail(myWeb, true, true, to, subject, body);
 HttpContext.Current = curCtx;
 }
 }
 }
 catch (Exception ex)
 {// handle error here!!!}

In office 365, you have ability to use SANDBOX solutions so the above classes are not supported. I used this trick to send email in the online environment using Sharepoint designer workflows


Option 4:

Use SP Designer to create email notifications. Quick and Easy and can be conditional too.


You could also create a reusable workflow for a content Type and associate with any list which contains that content type.


Wednesday, January 23, 2013

Sharepoint 2013 - Preview Account Get started!

One can easily get an account by registering on the link below.

Microsoft Office 365 Enterprise Preview plan highlights

  • 25 User Licenses
  • Familiar Microsoft Office applications for your Windows PC
  • Email and documents
  • IT admin tools and policies for user management
  • Data Loss Prevention
  • Mail archiving and compliance
  • Team sites for project management
Very Important : Do not migrate your sites to production YET!
Note: The Office 365 Preview is for testing purposes only. All configuration data, user data, and user accounts that were created while testing will be deleted when the preview ends.

You will need the below for account creation:
1. An email Id which will be used by Microsoft to send you important account info.
2. Phone number
3. Company address
4. A mobile number which can get a text message sent by Microsoft for verification purposes for the account creation via the link below.

My preview account got successfully set up and I am super excited as to get some hands-on experience with the new features of SP2013.
As I am exploring SP2013 preview ( office 365 ) I am sure I will come across some very interesting features and learnings which I think will be worth sharing...


SP Fest Chicago - What we did on the cloud?


Here's my speaker slide from SP Fest Chicago, where we discussed what we did on the cloud for Hyatt.


Tuesday, January 15, 2013

Performance Matters - SP2010!

I was researching about the performance in SP2010 and got this rich content of some really good to do's and not to do's which I would like to share.

Why Dispose?

Several of the SharePoint Foundation objects, primarily the SPSite class and SPWeb class objects, are created as managed objects. However, these objects use unmanaged code and memory to perform the majority of their work. The managed part of the object is much smaller than the unmanaged part. Because the smaller managed part does not put memory pressure on the garbage collector, the garbage collector does not release the object from memory in a timely manner. The object's use of a large amount of unmanaged memory can cause some of the unusual behaviors described earlier. Calling applications that work with IDisposable objects in SharePoint Foundation must dispose the objects when the applications finish using them. You should not rely on the garbage collector to release them from memory automatically.
 
Do not instantiate an SPWeb, SPSite, SPList, or SPListItem object within an event receiver.

Event receivers that instantiate these objects instead of using the instances passed via the event properties can cause the following issues:
  • Significant additional roundtrips to the database (one write operation can result in up to five additional roundtrips in each event receiver).
  • Calls to the Update method on these instances can cause subsequent Update calls in other registered event receivers to fail.
If you do not retrieve SPWeb, SPSite, SPList, or SPListItem objects from SPItemEventProperties and instead instantiate those objects within an event receiver, when you call Update on the new instances, you must clear it with the Invalidate method in the appropriate child class of SPEventPropertiesBase (for example, SPItemEventProperties.InvalidateListItem or SPItemEventProperties.InvalidateWeb).

Avoid creating and destroying objects unnecessarily in code, as this may require that extra queries be made against the database and may even involve code that is incorrect.

To return a single item from a collection, always use a Get* method when one is provided through a parent object, instead of iterating through the entire collection and using an indexer. For example, the SPWeb class provides GetFile, GetFolder, and GetListItem methods that you can use to return single items.


An SPWeb or SPSite object can occupy a lot of memory.

Avoid constructing objects of these types simply to get a reference to a parent object. Instead, to get a reference to a web application, use the static SPWebApplication.Lookup(Uri) method, and pass it a Uri object that is created with the URI of the web application. You can then get a reference to the farm by using the Farm property of the web application object. (You can get a reference to a remote farm by using the static Open(String) method.) The ContentDatabases property of the web application object contains a collection of the content databases in the web application. You can get a reference to a particular content database through this property if you know its index in the collection

 
Microsoft SharePoint Foundation 2010 and Microsoft SharePoint Server 2010 apply a default query threshold of 5,000 items. Any custom code that relies on query result sets that can exceed this maximum will not perform as expected. Queries on lists consisting of more than 5,000 items that include fields that are not indexed in their query conditions will also fail, because those queries must scan all rows in a list.
 

Do not use SPList.Items

SPList.Items selects all items from all subfolders, including all fields in the list. Use the following alternatives for each use case.
  • Adding an item
    Instead of calling SPList.Items.Add, use SPList.AddItem.
  • Retrieving all items in a list
    Instead of using SPList.Items, use SPList.GetItems(SPQuery query) . Apply filters, if appropriate, and specify only the fields you need to make the query more efficient. If the list contains more than 2,000 items, paginate the list in increments of no more than 2,000 items. The following code example shows how to paginate a large list.
  • Getting items by identifier
    Instead of using SPList.Items.GetItemById, use SPList.GetItemById(int id, string field1, params string[] fields). Specify the item identifier and the field that you want.
  • Do not enumerate entire SPList.Items collections or SPFolder.Files collections.
    The left column in Table 1 lists the methods and properties that if used will enumerate the entire SPList.Items collection, and cause poor performance and throttling for large lists. Instead, use the better-performing alternatives listed in the right column

  • Alternatives to enumerate SPList.Items

     
    Poor Performing Methods and Properties Better Performing Alternatives
    SPList.Items.XmlDataSchema Create an SPQuery object to retrieve only the items you want.
    SPList.Items.NumberOfFields Create an SPQuery object (specifying the ViewFields) to retrieve only the items you want.
    SPList.Items[System.Guid]  SPList.GetItemByUniqueId(System.Guid) 
    SPList.Items[System.Int32]  SPList.GetItemById(System.Int32) 
    SPList.Items.GetItemById(System.Int32)  SPList.GetItemById(System.Int32) 
    SPList.Items.ReorderItems(System.Boolean[],System.Int32[],System.Int32)  Perform a paged query by using SPQuery and reorder the items within each page.
    SPList.Items.ListItemCollectionPosition ContentIterator.ProcessListItems(SPList, ContentIterator.ItemProcessor, ContentIterator.ItemProcessorErrorCallout) (Microsoft SharePoint Server 2010 only)
    SPList.Items.ListItemCollectionPosition ContentIterator.ProcessListItems(SPList, ContentIterator.ItemProcessor, ContentIterator.ItemProcessorErrorCallout) (SharePoint Server 2010 only)
     
     
    Using the SPList.ItemCount property is the recommended way to retrieve the number of items in a list. As a side effect of tuning this property for performance, however, the property can occasionally return unexpected results. For example, if you require the exact number of items, you should use the poorer performing GetItems(SPQuery query), as shown in the preceding code example.
     
    Whenever possible, acquire a reference to a list by using the list's GUID or URL as a key.

    Alternatives to SPFolders.Files

    Poor Performing Methods and PropertiesBetter Performing Alternatives
    SPFolder.Files.Count SPFolder.ItemCount
    SPFolder.Files.GetEnumerator() ContentIterator.ProcessFilesInFolder(SPFolder, System.Boolean, ContentIterator.FileProcessor, ContentIterator.FileProcessorErrorCallout) (SharePoint Server 2010 only)
    SPFolder.Files[System.String] ContentIterator.GetFileInFolder(SPFolder, System.String)Alternatively, SPFolder.ParentWeb.GetFile(SPUrlUtility.CombineUrl(SPFolder.Url, System.String) (SharePoint Server 2010 only)
    SPFolder.Files[System.Int32] Do not use. Switch to ContentIterator.ProcessFilesInFolder and count items during iteration. (SharePoint Server 2010 only)


    Thursday, January 10, 2013

    SP2013 & Managed MetaData

    A very Happy New Year 2013 to all my friends, family and my Blog visitors!
     
    Seems like ages since I last blogged ..  well better late than never... Here comes my first blog post for the year with a new year resolution that I will try to blog regularly. At least once a month...
     
    In the new year 2013, my passion is to gain my hands-on expertise in SharePoint 2013.

    Before moving on to SDP2013, here's  a slide deck that I prepared for metadata navigation for SP2010, so that we all have a good idea of what we are talking about below.


    Now coming back to SP2013, my preference was to get started and so what is better than an online preview account.
     
    Please visit my blog post to understand the process... Click Here
     
     As I did some quick tests on my online SP2013 Environment, here are some of my findings related to Managed Metadata:
     
     
    New in SP2013:
    Data Sheet view – Add managed metadata column data entry support


    Navigation options - Managed Navigation: The navigation items can be represented using a Managed Metadata term set Both in Global as well as current navigation with the ability to edit the links.


     More to follow!


    Wednesday, August 29, 2012

    Data Migration - "Created By" Field Nightmare

    As Sharepoint consultants we have often been faced with this opportunity to port the data across environments. I came across such a scenario in one of my recent engagements where I had to push all the data from Excel to Sharepoint Lists.

    Below I used data migration from excel sheet, but if any migration tool that you have used does not support for the migration of created by and created date fields - you can fine tune the below code to your benefit.
     

    Couple of issues I would like to address which I faced and the solutions to those to help my SharePoint community members.

    1. Import n excel sheet to create a List via the Sharepoint User Interface - This has worked fine except that the look ups were not carried through in the List. I had to update the column types after the create.


    The look up column for Country needed to be changed


    Note : If the Excel column for Country did not have values from the data validation list, then you will need to add those values in the choice column above. By default it takes all the values form the Sharepoint column and converts it to a choice. 
     
     
    2.  "Created by" fields were mirrored with admin account. I needed to now convert these to the users who had created them since there was functionality to display only your own items to contributors.


    Here is a Visual web part I came up with to update the "Created by" and "Modified by" field to any other user based on an additional column value - "CopyCreatedBy" to update the user name. 


    For entering data - I could not view the List in data sheet view, Some research on the net showed I needed to install this below.
    If you do not see the data sheet view - Install the update for X64, to access Data sheet view. 2007 Office System Driver: Data Connectivity Components
    http://www.microsoft.com/download/en/details.aspx?displaylang=en&id=23734
    OK, That sorted that issue out. Now I entered some data for the user names.


    UX:


     The below code is not permormance savvy since it uses the crude way to access the list & data.
    Although the code works fine and performs great in a local environment, issue is with the way the Items property is accessed. The Items property queries ALL items from the Content Database for the current SPList and “unfortunately” does that every time we access the Items property. The retrieved items ARE NEVER CACHED. In the loop the Items property is accessed twice for every loop iteration – once to retrieve the Count, and once to access the actual Item identified by its index.
     
    Code:
     using System;  
     using System.Web.UI;  
     using System.Web.UI.WebControls;  
     using System.Web.UI.WebControls.WebParts;  
     using Microsoft.SharePoint;  
     namespace ChangeUserName.ChangeCreatedBy  
     {  
       public partial class ChangeCreatedByUserControl : UserControl  
       {  
         protected void Page_Load(object sender, EventArgs e)  
         {  
           if (!IsPostBack)  
           {  
             lblerror.Visible = false;  
             txtListName.Text = "";  
             txtwebSite.Text = "";  
             txtCopyCreateByCol.Text = "";  
           }  
         }  
         protected bool validate()  
         {  
           if (txtListName.Text =="" ||txtwebSite.Text == "" || txtCopyCreateByCol.Text == "")  
           {  
             lblerror.Visible = true;  
             lblerror.Text += "Please enter the Required Fields with *" ;  
             return false;  
           }  
           return true ;  
         }  
         protected void Update_Click(object sender, EventArgs e)  
         {  
           if (validate())  
           {  
             lblerror.Text = "";  
             try  
             {  
               using (SPSite site = new SPSite(txtwebSite.Text))  
               {  
                 using (SPWeb web = site.OpenWeb())  
                 {  
                   SPList list = web.Lists[txtListName.Text];  
                   foreach (SPListItem item in list.Items)  
                   {  
                     web.AllowUnsafeUpdates = true;  
                     SPUser user = web.EnsureUser(item[txtCopyCreateByCol.Text].ToString());  
                     string value1 = user.ID + ";#" + user.Name;  
                     item["Author"] = value1;  
                     item["Editor"] = value1;  
                     item.Update();  
                   }  
                   list.Update();  
                   web.Update();  
                   lblerror.Visible = true;  
                   lblerror.Text = "Successfully updated the created by field for all records of the list : " + txtListName.Text;  
                 }  
               }  
             }  
             catch (Exception ex)  
             {  
               lblerror.Visible = true;  
               lblerror.Text += "All Records could not be updated. " + ex.Message.ToString();  
             }  
           }  
         }  
       }  
     }